
It was volunteering in her children’s Montessori school garden that gave rise to her new series Wild Tales & Garden Thrills, stories bursting with the real-life experiences of young gardeners. Children see the world from a totally different perspective than adults and Venetta knows their adventures will surely inspire a new generation to get outside,
and get digging.
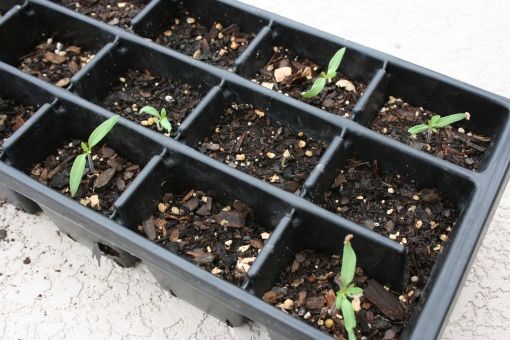
Holy nitrogen—we have sprouts! Did you ever think this day would come? You’ve prepared, patiently waited, tended to, and nurtured your seeds until finally they’ve burst through the surface. Did you hear? We have sprouts!
The whole neighborhood can hear you tap out your happy dance, so relish the moment and dance away—you’ve hit your first milestone. A big one, too, because as you may have noticed, not all your seeds germinated. Like people, seeds develop at different rates. It’s a fact of life. But rather than simmer in sorrow over the ones that didn’t make it, let’s rejoice in the little green seedlings we do have, and focus on how best to keep them healthy and happy.
If you started them indoors, it’s your job to see they grow to a decent size before transplanting to the great outdoors. Your plants will appreciate a gradual introduction to the heat and sunlight, a process known as “hardening off.” Try moving them to the patio, or a side of your home where there’s indirect sun, as this will help them adjust to their new surroundings before being thrust into the full sunlight of the garden.
If you must wait weeks before heading outside (due to chilly temperatures), you might need to transplant them into a larger container—the larger the container, the larger the roots can grow—while still indoors. Gingerly remove the entire root ball of dirt (go easy on that stem as it’s still fragile!) and transfer the seedling into the awaiting container, at least twice as large as the current container.
Once you’re ready to move them fully into the garden, simply follow the same transplanting procedure mentioned above, but this time, you’ll dig a hole twice the size of the current root ball (give ‘em a little space to grow). As you secure their place in the garden bed, lightly pat the soil around them. Form a “well” around their base to capture water, then follow with a good soaking. You can add a shot of “starter” fertilizer or mix in a bit of fish emulsion. The latter is gentle and easily absorbed. As they grow larger, add mulch around the small plants to keep the soil moist.
While we’ll talk about feeding your plants in more detail next time, here’s a quick rundown on the basics. The nutrients of any fertilizer are listed on the package, with the larger numbers representing N-P-K, or nitrogen-phosphorous-potassium. For an easy guide on which elements you’ll need, remember: nitrogen = green leaves, phosphorous = big roots and fruits, and potassium = overall wellness.
What does this mean? When you’re growing lettuce, broccoli, and any plant that is mostly “leaves,” you’ll want to give them a healthy supply of nitrogen. For plants like tomatoes, watermelon, onions and carrots, pile on the phosphorous to encourage “root and fruit” growth. Are your plants exhibiting a general malaise, or seem stunted? Give them some potassium.
Rejoice in your early success! We’ve still a few months to go before harvest.
